Unleash the Power of a Magic Monitor: How KVM, PIP, & PBP Enhance Your Workday.
Monitors
Starting your day positively can set the tone for a smooth and productive day. It’s the key to making your workday more enjoyable and effective. Say goodbye to the Monday blues and welcome a pleasant start to the week. But how can you create a comfortable and efficient workday? With the help of KVM, PIP, and PBP functions, managing multiple tasks becomes much easier. These tools are designed to streamline your workflow and elevate your working experience. In the sections below, we’ll show you how these powerful features can change the way you work.

Simplify Your Workspace with KVM: Control Multiple Devices on One Monitor
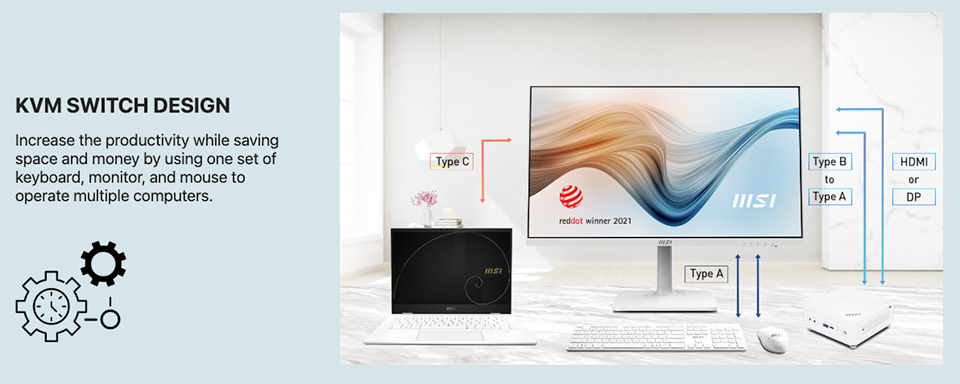
When starting a workday in the office or studio, we often find ourselves setting up a cluttered desk filled with essential devices like laptops, smartphones, and office PCs. Managing all these devices on a single monitor can be challenging. While adding a second monitor might seem like a solution, it also requires an additional keyboard and mouse, further crowding your workspace with electrical gadgets and cables. This is where KVM (Keyboard, Video, Mouse) technology comes to the rescue.
KVM lets you control multiple devices using one keyboard and mouse on a single monitor. It’s an efficient solution that simplifies your workspace and eliminates unnecessary clutter. MSI office monitors come equipped with the KVM function. With this feature, you can seamlessly manage all your devices from one monitor using a single keyboard and mouse. Moreover, some MSI monitors support USB-C Power Delivery (PD) charging, enabling you to charge your devices while displaying content—without needing extra power adapters or cables. By integrating KVM technology, you can enjoy a neat desk, improved efficiency, and a streamlined workflow.
Note: Some smartphones may not be compatible with keyboard and mouse control.
One Monitor, Dual Displays: Picture-in-Picture (PIP) and Picture-by-Picture (PBP)
In today’s multitasking environment, we often need to handle multiple tasks across different devices simultaneously. Whether it’s an office PC or a personal laptop, these devices might operate on separate network environments, such as an intranet and the internet. To simplify this complexity and boost productivity, Picture-by-Picture (PBP) and Picture-in-Picture (PIP) functions come to the rescue. These features allow you to manage two devices on a single monitor, effectively expanding your working area.
Picture-by-Picture (PBP): This function divides the monitor screen into two separate sections, displaying content from two devices side by side.
Picture-in-Picture (PIP): This feature creates a smaller window overlay on the main screen, letting you keep track of one device while focusing on another. By utilizing PBP and PIP, you can streamline your workflow, reduce the need for multiple monitors, and maximize your efficiency.
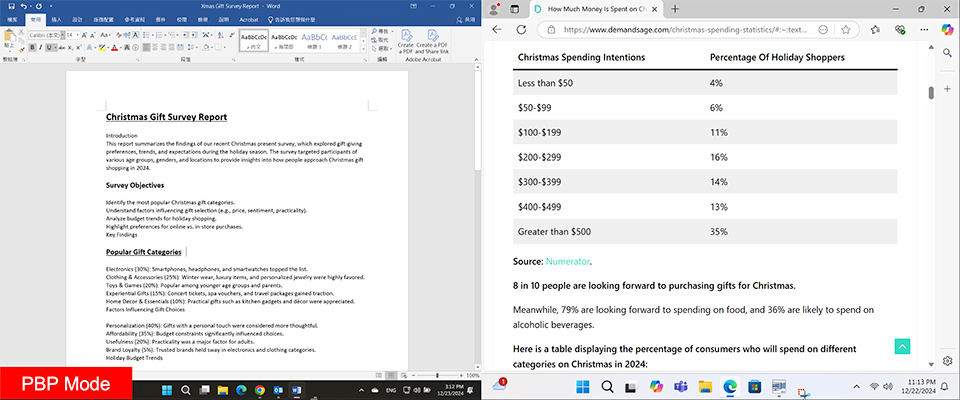
In PBP Mode, we can also transfer data between the two devices by using the mouse to drag and drop the files.
Note: The data transfer function is only available in some models, and you need to install the MSI Game Intelligence App first.
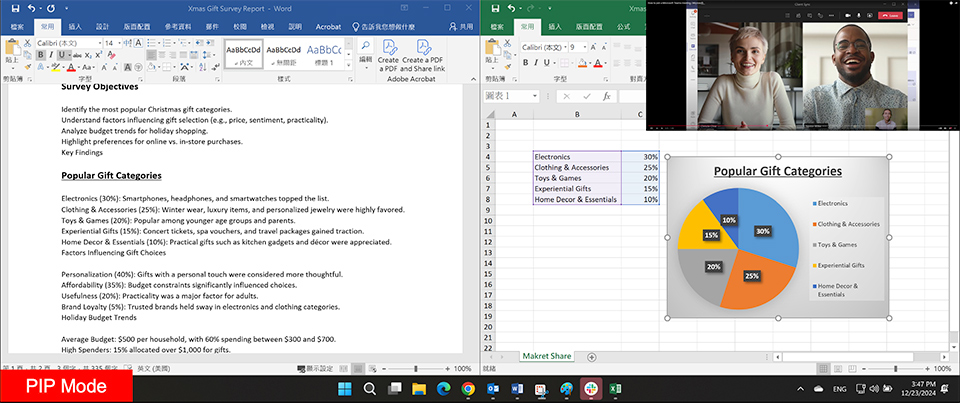
Picture-in-Picture (PIP): A Compact Solution for Multitasking
Picture-in-Picture is similar to Picture-by-Picture, but with a key difference—the second screen is smaller, leaving more space on the main display. This setup is ideal for those who need a larger working area while still having access to additional information. In PIP mode, the main screen occupies most of the monitor, while the second screen acts as a smaller overlay displaying supplementary content. For instance, during an online meeting with colleagues or clients, the smaller screen can show the video call, while the main screen displays your speech script or prepared data. One of the best features of PIP is its flexibility. You can easily switch the main and second screens to suit your needs, making it a practical and versatile tool for multitasking.
About the MSI KVM and PIP/PBP function operation, you can follow the blog instructions for setup or installation.
How to set KVM for MSI monitor: Link
Video Tutorial:
How to use the PBP function in different systems: Link
For more MSI monitor knowledge or tutorials, you can visit our Monitor Lab for the latest information.
Monitor Lab: Link
MSI KVM Monitor Support List
Summit MS321UP:
https://www.msi.com/Business-Productivity-Monitor/Summit-MS321UP
Modern MD342CQPW:
https://www.msi.com/Business-Productivity-Monitor/Modern-MD342CQPW
Modern MD342CQP:
https://www.msi.com/Business-Productivity-Monitor/Modern-MD342CQP
Modern MD272QXPW:
https://www.msi.com/Business-Productivity-Monitor/Modern-MD272QXPW
Modern MD272QXP:
https://www.msi.com/Business-Productivity-Monitor/Modern-MD272QXP
Modern MD272XPW:
https://www.msi.com/Business-Productivity-Monitor/Modern-MD272XPW
Modern MD272XP:
https://www.msi.com/Business-Productivity-Monitor/Modern-MD272XP
PRO MP275QPDG:
https://www.msi.com/Business-Productivity-Monitor/PRO-MP275QPDG